Set Up JWT Authentication for Your Site

  • Platform
  • Evoq Content
  • Evoq Engage

Prerequisites

A host / super user account. Hosts have full permissions to all sites in the DNN instance.

Steps

  1. Install the DNN JWT Auth Handler.
    1. Go to Host > Extensions.

      Host > Extensions

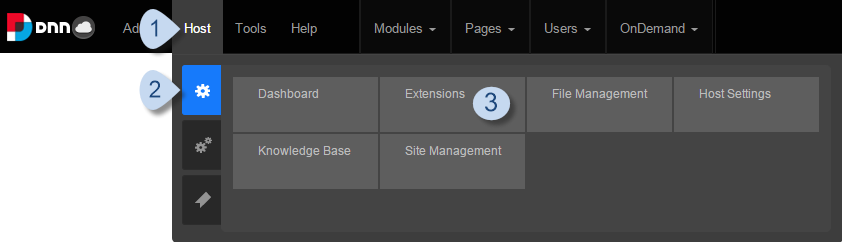
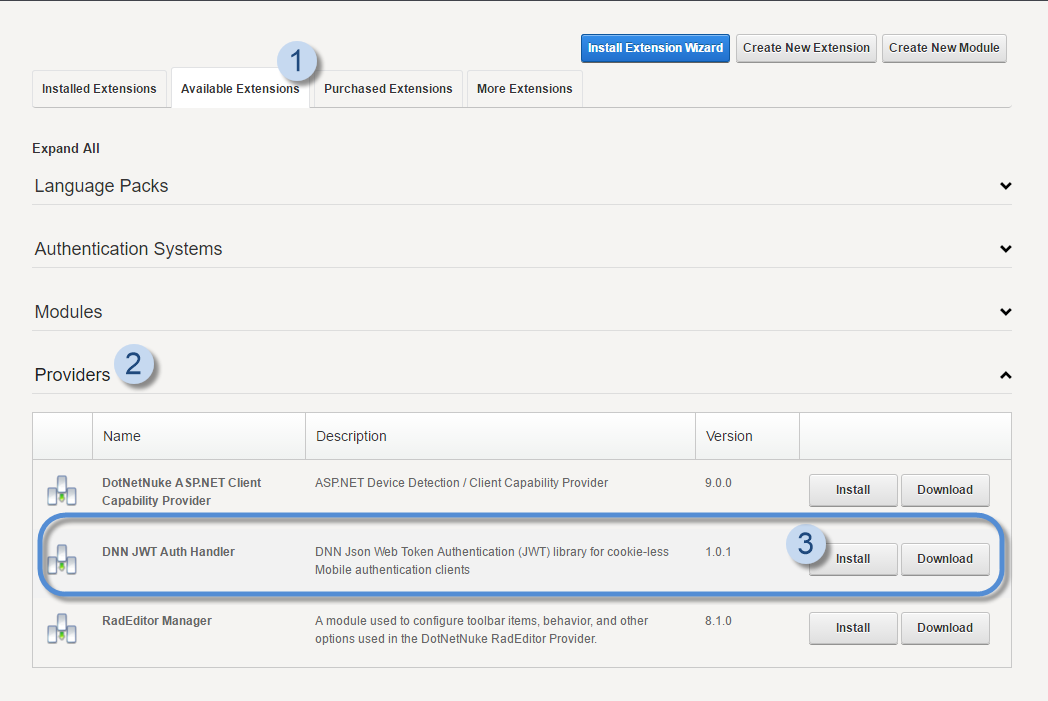
    2. In the Available Extensions tab, expand the Providers section, search for DNN JWT Auth Handler, then click/tap its Install button.

      Available Extensions > Providers > DNN JWT Auth Handler > Install

    In your web.config file, the JWTAuth line is added inside the <messageHandlers/> tag.

    
        <authServices>
            <messageHandlers>
                <!-- other message handlers -->
                <add name="JWTAuth" type="Dnn.AuthServices.Jwt.Auth.JwtAuthMessageHandler, Dnn.AuthServices.Jwt" enabled="false" defaultInclude="false" forceSSL="true"/>
            </messageHandlers>
        </authServices>
            
  2. (Optional) Enable JWT authentication for all Web API requests.
    1. Access the web.config file.
    2. Search for the newly-added JWTAuth line inside the <messageHandlers/> section.
    3. Change JWTAuth's enabled and defaultInclude attributes to "true".
      
          <add name="JWTAuth" type="Dnn.AuthServices.Jwt.Auth.JwtAuthMessageHandler, Dnn.AuthServices.Jwt" enabled="true" defaultInclude="true" forceSSL="true" />
                                  
    Tip: Developers: To enable JWT authentication for your specific Web API, add the following attribute to the controller class:
    
        [DnnAuthorize(AuthTypes = "JWT")]
                            
  3. (Optional) Enable cross-origin resource sharing (CORS) to allow requests from remote JavaScript clients.

    CORS is required only if the Web API would be accessed through a web browser. CORS is not required by native mobile or desktop apps.

    Warning: Enabling CORS allows external sites to access your site, therefore, making it vulnerable to cross-site scripting (XSS) attacks.
    1. Access the web.config file.
    2. In your web.config file, add these access control lines inside the <customHeaders/> section.
      
          <add name="Access-Control-Allow-Origin" value="*" />
          <add name="Access-Control-Allow-Headers" value="accept, accept-language, content-type, accept, authorization, moduleid, tabid, x-dnn-moniker" />
          <add name="Access-Control-Allow-Methods" value="GET, POST, PUT, HEAD, OPTIONS" />
                                  
  4. (Optional) Developers: Enable additional logging for advanced debugging, testing, or troubleshooting.
    1. Access the DotNetNuke.log4net.config file.
    2. In your DotNetNuke.log4net.config file, add the following logger lines after the </root> closing tag.
      
          <!-- The following is required to troubleshoot provider registration issues. -->
          <logger name="DotNetNuke.Web.Api.Auth">
              <level value="TRACE" />
          </logger>
          <!-- The following is required to troubleshoot failing Web API calls. -->
          <logger name="DotNetNuke.Dnn.AuthServices.Jwt">
              <level value="TRACE" />
          </logger>